A multi dynamic site with a whole lot of content. get an up to date info on techs and satelite related problems
Showing posts with label Windows Tutorial. Show all posts

Wednesday, January 8, 2014

TRANSFER FILES VIA WIFI

A friend of mine bought a laptop yesterday and later this cover that his so called high quality laptop has no bluethoot .He found it very hard to send files from his phone to his laptop without using a cable. He asked me to come to his house today ,which i did. When i got there he was like ""How much for an external bluethoot bla blab bla"and after all said and done. We where able to send files to his system via wifi. i though of sharing same idea with you. Simple read and remember to share with friends.

REQUIREMENTS

1. A laptop
2. A smart phone 'Andriod, Iphone'.
3. A wifi internet modem [optional]
4. Wifi file transfer[Download from Google play store]

PROCEDURES

1. connect your modem to the internet or make your laptop a wifi hot spot.
2. Connect your phone with wifi.
3. Open your apps i.e the wifi file trasnfer apps and click on start service.
4.It will generate a ftp address in this formate -- ftp://ip adress:p0rt.
5.Open your computer and fill in the ftp address in the adress bar and you will see the file manager of your phone in your computer. No internet connection needed .

Note: You need a wifi connection in both device.

CLick on the share button to share with friends.
Enjoy it

Monday, November 11, 2013

SHUT DOWN YOUR PC AT A SPECIFIC TIME. EVEN WHEN YOU FALL ASLEEP.

Hello friends . Today am going to share with how to shut down your pc at a specific time. Even when you fall asleep and for this tutorial we are going to make use of um a software called Freelabs.

Freelabs Restart Computer is a Simple Tool that will Restart/Shutdown/Logoff your Computer on a Timely Basis. It's main windown stays on Top of your Windows, It's Small, Easy to Use and Transparent.

Features of this application


Freelabs Restart Computer's Main / Key Features
This Application is like a Sleep Timer on TV, You will Set the Application to Shut Down, Restart or LogOff at a Specific Time even when your Friends are Using it, This will Make your Computer More Secure and Safe.


You can download it from the download link below

Enjoy it.

Tuesday, November 5, 2013

COMPUTER USER HEALTH GUIDELINES


1. Work in a well designed work area .

2. Alternate work activities to prevent physical and mental fatique. If possible, change the order of your work to provide some variety.

3. Take frequent breaks. Every 15 minutes, look away from the screen given your eyes a break . At least once per hour, get out of your chair and mve around. Every two hours, take at least a 15 minute break.

4. Incorporate hand,arm, and body stretching exercises into your breaks. At lunch, try outside and work.

5. Make sure your computer monitor is design to minimize electromagnetic radiation (EMR). If it is an older model, consider adding EMR reducing accessories.

6. Try to eliminate or minimize surrounding noise . Noisy environments contribute to stress and tension.

7. If you frequently use the telephone headset. Cradling the telephone between your head and shoulder can cause muscle strain.

8. Be aware of symptoms of repetitive strain injuries. Soreness, pain, numbness, or weakness in neck, shoulders, arms, wrists, and hands. Do not ignore early signs; seek medical advice.

HOW TO MAINTAIN YOUR COMPUTER SYSTEM.


1.Start a notebook that includes information on your system.
This notebook should be a single source of information about your entire system, both hardware and software. Each time you make a change to your system, add or remove hardware or software, or when you change system parameters , you should record the change in your notebook. Items you should iclude in the notebook are the the following:
  • Serial numbers of all equipment and software.
  • Vendor support telephone numbers. Look up these numbers in your user manuals once and record all of them at the front of your notebook.
  • User IDs, passwords, and nickn
  • Data and vendor for each equipment and software purchase.
  • Printouts of key system files (e.g., autoexec.bat and cofig.sys).
  • Trouble log; a chronological history of any equipment or software problems. this history can be helpful if problem persists and you have to call for support serveral times .
  • Notes on discussions with vendor support personnel (can be combined with trouble log).
2. Periodically review disk directories ad delete unneeded files.
Files have a way of building up and quickly can see up your disk space. If you think you may need file in the future, back it up to a floppy disk. Consider using an uninstaller utility program.
3. Any time you work inside your computer, turn off the power and disconnect the equipment from the power source.
In addition. before you touch anything inside the computer, touch an unpainted metal surface such as the power supply. This will help to discharge any static electricity that could damage internal components.
4. Reduce the need to clean the inside of your system by keeping the surrounding area dirt and dust free.
Floppy disk cleaners are available but should be used sparingly ( some owners never use them unless they experience floppy disk problems ). If dusts builds up inside the computer, remove it carefully with compressed air and a small vacuum . Do not touch the components with the vacuum.
5. Back up your files data.
Use the operating system or a utility program to create an emergency or rescue disk to help you restart you computer if it crashes. Important data files should be copied regularly to disks , tape, or another computer.
6. Periodically defragment your hard disk. Defragmenting your hard disk re-organizes files so they are contiguous (adjacent) clusters and makes disk operations faster. Always back up your system before you run a defragmention program.
7.Protect your system from computer viruses. Computer viruses are programs designed to infect computer systems by coping themselves into other computer files . The virus program spread when the infected files are used by or copied to another system. Virus programs are dangerous because often they are designed to damage the files of the infected computer. You can protect yourself from virus by installing an anti virus in your computer.
8. Learn to use diagnostic programs.
If your did not include diagnostic programs, obtain a set. This programs helps you identify and possible solvce problems before you call for technical assistance. Some system manufacturers now include diagnostic programs with their systems and ask that you run the programs beforre you call for help.
ames for websites and online services.

Saturday, November 2, 2013

EXTRACT TEXT FROM IMAGE USING OCR SOFTWARE.

Optical Character Recognition (OCR) lets you convert images with text into text documents using automated computer algorithms. Images can be processed individually (.jpg, .png, and .gif files) or in multi-page PDF documents (.pdf). These are some of the types of files suitable for OCR:
Image or PDF files obtained using flatbed scanners
Photos taken with digital cameras or mobile phones

EXAMPLE:
Suppose you wanted to digitize a magazine article or a printed contract. You could spend hours retyping and then correcting misprints. Or you could convert all the required materials into digital format in several minutes using a scanner (or a digital camera) and Optical Character Recognition software 'OCR'. SOURCE: finereader.abbyy.com

HOW IT WORKS


Optical Character analyzes the structure of document image. It divides the page into elements such as blocks of texts, tables, images, etc. The lines are divided into words and then - into characters. Once the characters have been singled out, the program compares them with a set of pattern images. It advances numerous hypotheses about what this character is. Basing on these hypotheses the program analyzes different variants of breaking of lines into words and words into characters. After processing huge number of such probabilistic hypotheses, the program finally takes the decision, presenting you the recognized text.
You can also upload your file online and extract the text in it . simple gotofree-ocr.com upload image , insert captcha and click on the send button .

You can also download the software from the download button below
DownLoad Here
Note: You need Internet to Install the OCR on your PC after Downloading
Enjoy it

CONTROL YOUR PC WITH YOUR EYES USING EVIACAM


Hello friends. Technology has taking a new shape, with somany people trying to create new things. This tech is not new though have been usiing it for quite some time now. Ok today am going to share with you how to control your pc with your eyes using Eviacam. Eviacam is a Mouse replacement software that moves the pointer as you move your head. It works on standard PCs equipped with a web camera. No additional hardware is required. Based on the award winning Facial Mouse software. For Linux and Windows systems.


REQUIREMENTS

1. A PC

2. Eviacam installed on your PC.


HOW TO USE IT


The first time you install and configure your webcam before using eViacam. It's important to configure your camera to manual exposure mode and adjust this parameter to get around 25 fps or more. Most modern camera scan deliver 30fps. Please check your webcam manually if needed. Once installed open eviacam automatically detect the camera. Place the camera toget a frontal view of your face. The width of your face in the picture should be one-third of the width of the frame. Focus tracking box around the face.


Turn on tracing of the file menu. Try moving your head and see the results. You should be able to reach all areas of the screen with the mouse pointer.


To click just stop pointing your Finger to the desired position. In a few moments click will be generated automatically. You can use the window at the top of the screen to select different Modes of clicks.


Download here

Enjoy it.

Tuesday, October 29, 2013

PURCHASE A COMPUTER SYSTEM


Hello friends. At some point in time , perhaps during this course , you probably will decide to buy a computer system. It may be your first system or a replacement system. The decision is an important one and will require an investment of both time and money. The guidelines are presented to help you purchase, install, and maintain your system. Assume you are purchasing a desktop personal computer, often referred to as a PC. It is further assumed that the computer will be used for home or light business use.

HOW TO PURCHASE A COMPUTER SYSTEM
1. Determine what applications you will use on your computer: this decision will guide you as to the type and size of computer.Artists and others who work with graphics will need a larger, better quality monitor, and additional disk space. Advice: get a Dual Core Processor cus is ideal for multi-tasking and multimedia.
2.Choose your software first: Some packages run only on Macintosh computers, others only on a PC. Many packages run only under the windows operating system. In addition, some software requires more memory and disk space than other packages. You nprobably will want at leastsoftware for word processing and access to the internet and world wide web.Also consider purchasing an integrated package or a software suite that offers reduced pricing on several applications. Be sure the software contains the features that are necessary for the work you will be performing.
3. Be aware of hidden costs: Realize that some additional cost are associated with buying a computer .Such costs might include an additional telephone line or outlet to use modem, and paper, floppy disk holders , reference manuals on specific software packages, and special training classes yuo may want to take . Depending on where you buy your computer, the seller may be willing to include some or all of these in the system purchase price.
4.Buy equipment that computer systems , monitors and printers reduce eletrical consumption if they have not been used for some period of time, usually several minutes . Equipment meeting the guide lines can display the energy star logo.
5.Consider buying from local computer dealers or direct mail companies . Each has certain advantage .Local dealers more easily can provide hands on support than mail order companies, which usually are limited to phone support mail order companies, however,often provide the lowest prices. Local companies can be found in  telephone book.
6. Use a spreadsheet: Use a separate sheet of paper to take note of each vendors system and then summarize the information on the spread sheet. The important thing to do when shopping for a system is to make sure you are comparing identical or similar configuration.
7. Consider more than just price: Do not necessarily buy the lowest cost system . Consider intangibles such as how long the vendor gas has been in business, its reputation for quality and reputation for support.
8. Do some research : Talk to friends , co workers and instructors. ASk what type and software they bought and why.
9. Look for new software: Many system vendors include free software with their systems.Some even let you choose which software you want . Free software only has value, however, if you would haad purchase it if it had not come with computer.
10. Buy a software compatible with the ones you use elsewhere: if you use a personal computer at work or at some other organization, make sure the computer you buy is compatible. That way, if you need or want to, you can work on projects at home.
11.Consider purchasing an on site service agreement. If you use your system for business purpose other wise are unable to be without your computer . consider purchasing an on site service agreement through a local dealer or third party companies. Agreements usually state that a technician will be on site within 24 hours . If your sytem includes on site service for only the first year , extend the service for two or three years when you buy the computer.
12.Use a credit card to purchase your system: Many credit cards now have purchase protection and extended warranty benefits that cover you in case of loss or damage to purchase goods. paying by credit card also gives you time to install and use the system before you have to pay for it. Finally , if you are not satisfied with the system and are unable to reach an agreement with the seller , paying by credit card gives you certain rights regarding withholding payment until the dispute is resolved. Check your credit card agreement for specific details.
13. Avioding buying the smallest system available : Studies show that many users become dissatisfied because the did not buy a powerful enough system. Plan to buy a sytem that will last you for at least three years . If you have to buy a smaller system, be sure it can be upgraded with additional memory and devices as your system requirements grow.

Monday, October 14, 2013

SEE THE PASSWORD IN ANY LOGIN FORM.

Am going to start this article by asking a very simple question. Have you ever used your friend or colleague computer to access login sites and you found out that the login details of your friend or colleague has been filed. You got the user name, but the password is covered with asterisk{******} ? I believe the answer is 'yes' and although you can login to that particular site at the moment using his login details but you can't login to his account using a different system.
Not to worry . Today am going to share with you a simple trick that would help you see the password in any login page. Simple read and carefully follow the steps below.

PROCEDURE


1. Using your friend computer. Simple goto the site you think your friend would have been logged in previously.

2. Now you would see some thing like this:

3. Simple copy and paste below code into your web browser address:

javascript:(function() {var%20s,F,j,f,i;%20s%20=%20%22%22; %20F%20=%20document.forms;%20for(j=0;%20j

4. A new window would pop up . You can now see the password behind the asterisk.


Enjoy it

If this post has been well recieved by you please share with friends.

Saturday, September 28, 2013

USE ANY SIM WITH A LOCKED INTERNET MODEM TO BROWSE ON PC.

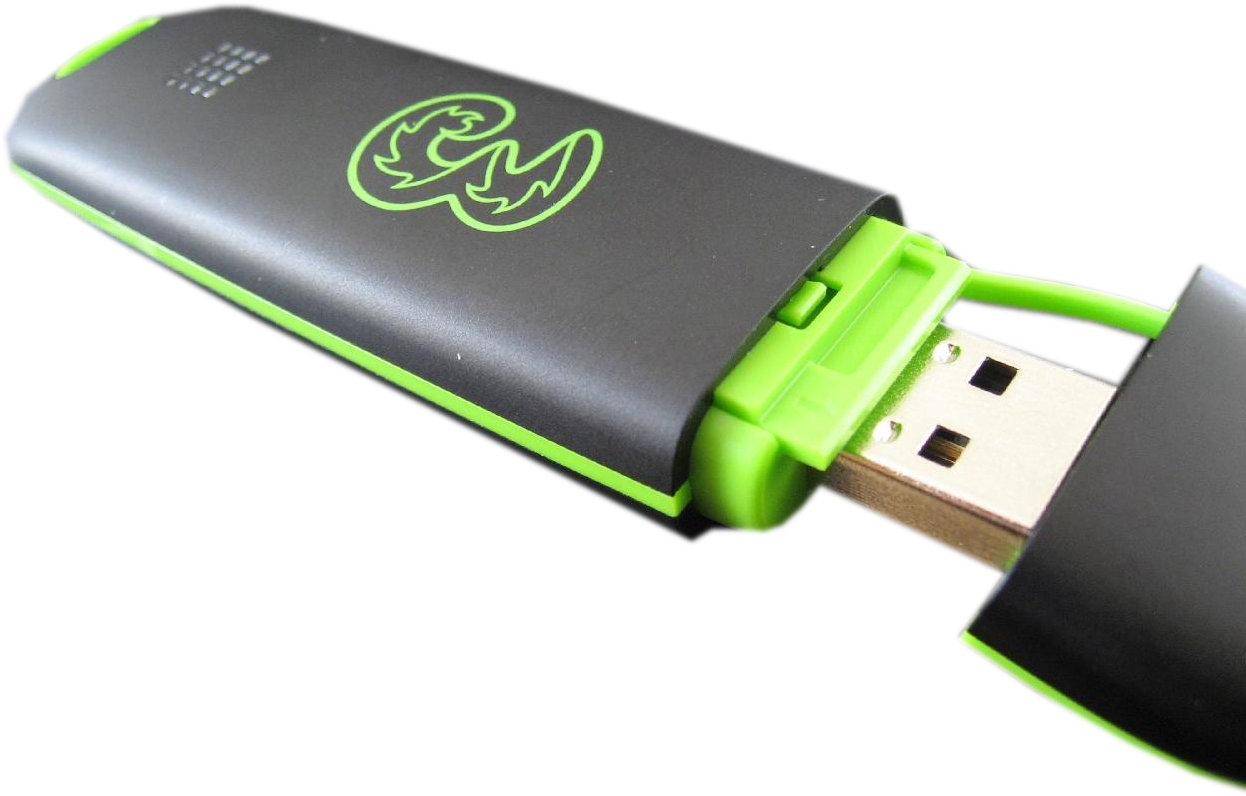
It has come to my notice that most newly created um internet modems are been encrypted, 'Encrypted' in the sense that you can only use same network sim card for a particular modem as this is part of the @xstrategy of the 'ISP' internet service provider to earn more money. So in this post am going to show you how you can browse the internet with a locked internet usb modem with any sim using Nokia PC suite or any PC suite As this would help You to connect your active sim to the internet via your pc suite using your locked modem. You can also View my other tutorial on how to use generic pc suite on PC.

REQUIREMENTS


1. Nokia PC suite Download
2. locked usb modem

PROCEDURES


1. Insert any sim into your locked modern and plug to pc.

2. You would get an invalid sim. Simple ignore it and close the modern software.

3. Make sure your pc suite is already installed in your system , now open it .

4.Click on file >> connect to the internet >> scroll down and click on on the spanner icon.

5. Now this is the most important part. Click on the drop down box and select your modem. Click on the arrow point to the right to procide.

6.Now choose manual configuration and insert the particular access point of the sim card that's in your modem.

7. Click connect. Thats it.

If this post has been well recieved by you please do us to share this post by click on the share buttons below.

Tuesday, September 24, 2013

GENERIC PC SUITE FOR ALL MOBILES PHONES.


Hello friends friends today am going to share with you a generic pc suite for all mobiles.It has been some what hectic for some mobile phones to manage the contents on their phones, plus there are somany phones that cannot establish a successfull connection between there phones and the computer. Some of this mobile phones does'nt have the required software to establish a successful connection to the computer e.g Tecno, chinese clone phones, while some major phone manufacturals have pc softwares manufactured to manage the content of their mobile phones for example:Nokia [PC suite ] Blackberry [Desktop Manager] e.t.c. So on that note am introducing mobiledit to you.


This PC suite is compatible with all kinds of phones plus it has drivers for all kinds of phones.

Main features of mobiledit


*.The only universal PC Studio with thousands of phones supported

*.Manage, improve and print a phonebook from the comfort of a computer

*.Copy phonebook from any phone to a new phone regardless of manufacturer or system

*.Backup all phone content to a PC or Internet cloud storage

*.Complete ringtone editor

*.Built-in video editor
*.Live view of phone and card memory, battery, signal, IMEI and more

*.Contact optimization and internationalization

*.Copy pictures and videos between phone and PC

*.Download, read, store and print text messages

*.Send text messages using PC keyboard

*.Install applications to the phone from a PC

*.And many more

Support


Like i said earlier on, this pc suite supports all kinds of phones. You can check the list of supported model here.

You can download mobiledit Here.

Now the demerit of this pc suite is that , it only works on Window os i.e window operating system. Not to worry have got another Universal Pc suite equivalent to mobiledit that runs on Mac os and it is called
SynMate.

You can learn more and also download SynMate for Mac os below:

Wednesday, September 11, 2013

CUSTOMIZE FOLDER COLOUR


Many people are fond of customization. I hope you also. Today I am going to share how to customize folder color in your any drive whether it is C: or D: or any other. Software makes our computing easy and wonderful so you can take idea that it can be done using a Software. I will provide you download link of that software as well as I will explain you how to use this software. This works with windows OS only, I am using it on Windows 7 but I hope it will work with Windows 8 also. But I never tried it on Windows XP so if it works windows xp also then please your comment below. So that other users also come to know that. Okay, Now I will not take your more time. Let me start my post from first step.

step 1:

Obviously, you have to download the software. So name of the software is FolderColorizer. You can download it from below given download button.


step2

Now after download & install the FolderColorizer. Just do right click on any folder of which colour you want to change. Here you will see Colorize ! in context menu. So click on that and choose any folder for your selected folder


If you like wapbeast please share this post with your others

Enjoy it

Tuesday, September 10, 2013

ENABLE THE HIDDEN ADMINISTRATOR ACCOUNT ON WINDOWS 7 OR VISTA


Many people familiar with prior versions of Windows are curious what happened to the built-in Administrator account that was always created by default. Does this account still exist, and how can you access it?

The account is created in Windows 7 or Vista, but since it’s not enabled you can’t use it. If you are troubleshooting something that needs to run as administrator, you can enable it with a simple command.Note: You really shouldn’t use this account for anything other than troubleshooting. In fact, you probably shouldn’t use it at all.
 

Enable Built-in Administrator Account


first you’ll need to open a command prompt in administrator mode by right-clicking and choosing “Run as administrator” (or use the Ctrl+Shift+Enter shortcut from the search box)
Now type the following command:
net user administrator /active:yes
You should see a message that the command completed successfully. Log out, and you’ll now see the Administrator account as a choice. (Note that the screenshots are from Vista, but this works on Windows 7)

You’ll note that there’s no password for this account, so if you want to leave it enabled you should change the password.
Disable Built-in Administrator Account
Make sure you are logged on as your regular user account, and then open an administrator mode command prompt as above. Type the following command:

net user administrator /active:no

The administrator account will now be disabled, and shouldn’t show up on the login screen anymore.


Monday, September 9, 2013

Increase internet speed without software

Increase internet speed by 20% without any software –
Microsoft reserves 20% of your available bandwidth for their own purposes like Windows
Updates and interrogating your PC etc. By unreserving this bandwidth, you can make your
internet connection faster. By 20%. The steps to do so are
STEP1


Click Start then Run and type gpedit.msc and click Enter.

STEP2


Then go to Local Computer Policy>Computer Configuration>Administrative
Templetes>Network>QoS Packet Scheduler. Click on QoS Packet Scheduler. In the right side
, find Limit Reservable Bandwidth and double click on Limit Reservable Bandwidth.


STEP3

It will say it is not configured but the truth is under the ‘Explain’ tab. Select
‘Enable’ and set reservable bandwidth to zero.

STEP4


Click on ‘Apply’ and your internet speed will boost up by 20%
Source: Pkgames.net

Really sorry for not droping something new. Have been down for sometime now just trying to recuperate.

Do remember to leave your comments below, also share with friends by clicking on the share button below.

Enjoy it

Thursday, September 5, 2013

USE YOUR SYMBIAN PHONE AS HOTSPOT.

Hello friends, is mark francis again and today am going to share with you how to use your symbian phone as a hotspot allowing neighboring device to connect and browse using your data. I could remember last two years when mtn introduced mi fi saying you can make use of the device to connect with five other devices but with this tutorial theirs no limited to the number of devices you can share data with. Simple read and carefully follow the steps below.
STEP1
Download this symbian application , install and run. Is a premium version.
STEP2
Make sure you subscribe to a data plan. Now open the application and click on the start button
STEP3
You would get a message asking if you would like to share your internet service with others click yes and select your access point.
STEP4
If you are using a laptop , simple scroll to your tray at the buttom part of your desktop and open network. You would see your mobile device. Connect and browse using your phone as hotspot. You can encrypt your internet connection to prevent intruders from using your internet service.
You can also share this with your friends by click on the share button below. Enjoy it

Tuesday, September 3, 2013

ADD APPLICATION TO RIGHT CLICK

Hello friends , today am going to share with you how to add your favorite application to right click menu using notepad . Carefully follow the steps below. STEP1 Open your start menu and type notepad in the search box or locate your notepad and open it. STEP2 Copy and paste this code in notepad Windows Registry Editor Version 5.00 [HKEY_CLASSES_ROOT\DesktopBackground\Shell\Menu1] "MUIVerb"="Apps" "SubCommands"="notepad;calc;firefox" "icon"="explorer.exe" [HKEY_LOCAL_MACHINE\SOFTWARE\Microsoft\Windows\CurrentVersion\Explorer\CommandStore\shell\notepad] @="Notepad" "icon"="notepad.exe" [HKEY_LOCAL_MACHINE\SOFTWARE\Microsoft\Windows\CurrentVersion\Explorer\CommandStore\shell\notepad\command] @="notepad.exe" [HKEY_LOCAL_MACHINE\SOFTWARE\Microsoft\Windows\CurrentVersion\Explorer\CommandStore\shell\calc] @="Calculator" "icon"="calc.exe" [HKEY_LOCAL_MACHINE\SOFTWARE\Microsoft\Windows\CurrentVersion\Explorer\CommandStore\shell\calc\command] @="calc.exe STEP3 This is a predefined set of applications, add application name to"SubCommands"="notepad;calc"in above code (e.g to add word, addwinword after calc after putting a semi colon (;)) AND paste in the following code further: [HKEY_LOCAL_MACHINE\SOFTWARE\Microsoft\Windows\CurrentVersion\Explorer\CommandStore\shell\myapp] @="" "icon"="
STEP4 Now, save it as .reg on your desktop
. And double click it and click OK on asking.
Enjoy it

Sunday, August 25, 2013

HOW TO FORMATE DISKETTE/FLASH DISK.


Hi friends, today am going to share with you how to format a diskette/flash disk e.t.c. Some people still make use of it to store important files, although some people think the days of diskette has come and gone, let me give you this lill hint: some people still make use of diskette to save secret details , cuz they believe intruders won't give it a second though cuz every one thinks the diskette is out dated. Well am not going to talk about security today and like i said earlier on am going to share with you how to formate a diskette/flashdisk e.t.c

STEP1

Insert the diskette /flash

STEP2

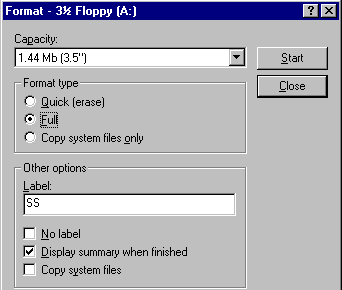
Double-click ''My computer on the screen programmable setting menu'' you will see it appears as 3 half floppy (a) diskette or Flash Removable disk.

STEP3
Right click the drive

STEP5

Click format, the format dialog box appears

STEP6
Click the type of format you want your menu to perform.

STEP7

If the disk is not formatted, select the 'FULL option' and click start

Sunday, August 18, 2013

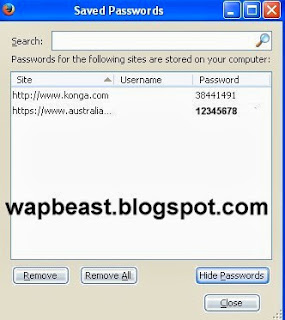
HOW TO EXTRACT STORED PASSWORD FROM FIREFIX

Somany people make the mistake of asking firefox to remember their password in another system { Not a personal computer} unknown to them that both website,password and account name can be extracted . So today am going to share with you how to extract stored password from firefox .
STEP1

Open your firefox browser.

STEP2

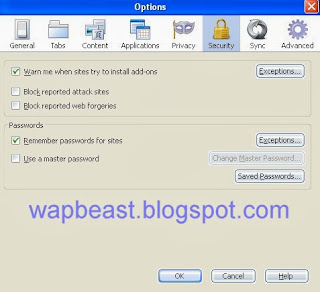
Goto your firefox menu >>> scroll down to options>>> Click on security. A new window would open


STEP3

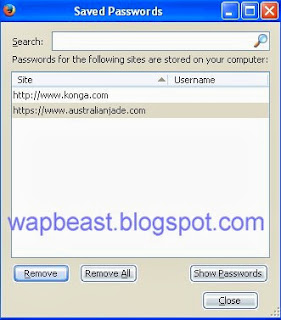
Click on save password below. Another window would open showing you all the website and email address or user name you used to open an account with that particular website. You can write down the name or email address as this can serve as the login name.


STEP4

Now scroll down and click on show password. you would get a prompt message asking you if you really want firefox to display the password. Click yes. A new window would popup with all the password stored.


Note: Do not save your password in any system that is not yours. If you must ask firefox to remember your account details. You would have to secure every thing stored in firefox.

I would share with you how to use a master password to secure your account details with firefox.


Do remember to leave your comments below.

If you like us please share us with your friends.

Enjoy it

Saturday, August 17, 2013

HOW TO MAKE USE OF TRAIL VERSION OF ANY SOFTWARE FOR LIFE.


Hello friends, today am going to share with you how to use trail version of any software for life . Also discuss how to solve cases of softwares that base their trial limits on frequency. Just read and follow these steps carefully.


STEP1
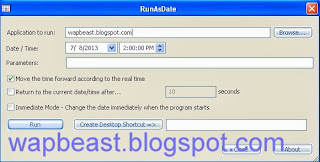
Download this software, Extract and run.
STEP2

A new window would pop up
N/B : Take note of the day you install the trail software.
STEP3

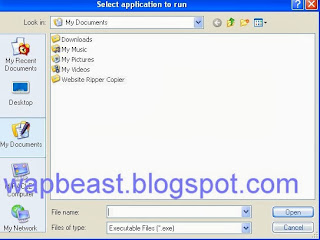
Now you would have to select the software you want to run.


It does'nt matter if the trail limit is over. Just select the software, set the date you want the software to run. Remember to always set the date back ward.

For example if i install a software today been 17-08-2013 and the software is set to expire september 17-08-2013. Meaning i can only run this software withing this 30 days. Using the above software you can set the software to run at a set date and um it does'nt really matter if the software has expired or not.

You can now use any software for life.

How to bypass trail limits of softwares that work with frequency.

When i say softwares that base their trail limit on frequency it simply means those softwares that counts the number of time you open them E.g WebEasy Professional. In such cases you can make use of the following methods below.

STEP1

You can use the above software to install the software over and over again. For example if i use the above software to install the trail software on the 17-08-2013. When next i want to use it to install the software i would have to change the date to an early date E.g 17-07-2013.

STEP2
You can also learn how to totally un -Install any Trail software from your system. With this you can Uninstall and install trial softwares without geting a pop up messages asking you for serial keys bla bla bla.

Do remember to leave your comments below. You can also share use with your friends on facebook and twitter.

Wednesday, August 14, 2013

HOW TO TOTALLY REMOVE A SOFTWARE PROGRAM IN WINDOWS.


Computer users install and remove softwares from their system on a regular but what they don't really know is that the uninstallation utility does'nt remove the program completely. There are some entries and registry left, some files in some folders that is not related to the software itself.

All this and more reduces the speed of your computer.

Although there are somany softwares online that claims to totally remove programs from your system , softwares like Absolute UninstallerRevo Uninstaller e.t.c. All these softwares are use to totally remove programs from a computer but they sometimes fail to completely uninstall these softwares from the system. So today am going to share with you a very good method of totally removing a program from a system.

HOW TO TOTALLY REMOVE A PROGRAM FROM A SYSTEM.

We are going use WebEasy professional as an example.


1. Goto control panel >>> Click on add /remove programs.

2. A new page would open, scroll down and select the software you want to uninstall and click on uninstall.


3. Remeber there are some files left in some of the folders. So goto program files folder or appdata folder and look for any folder with the name of the software you uninstalled and delete the folder and the files in it.


4. Goto Start menu search box and type 'Temp' before you click on the search button change the search destination to the path were the software was installed, i.e C:\ or D:\ now click on the search button. You can empty the entire folders . If you get an erro rmessage while trying to delete a file or folder leave the file or folder.


5. You are almost there. Now goto start menu search box and type 'Regedit' you would see for different files click on ''regedit.exe''

You would see the following files:

HKEY_CURRENT_USER\Software
HKEY_LOCAL_MACHINE\SOFTWARE
HKEY_USERS\.DEFAULT\Software

I would advice you to start opening this files one by one to check for the files you want to delete. So all you need do is press CTRL + F , and type in the name of the software. For example since we are using 'WebEasy professional ' we can input webeasy professional in the find box and press enter.

Now delete any file with the name webeasy professional or with the name of the software you uninstalled, press F3 to find next and delete it. Note: keep pressing F3 to find next untill it says no file found in Registry.

Some programs have different names. For example WebEasy professional uses 'Avanquest ' to store part of there registry. So to make sure you delete every thing also type in the name of the website, software developer or company that owns the software and press F3 to find next. Make sure you delete the registry file.


NOTE:You have to be careful while deleting files in the registry. Just so you don't end up deleting important files.


Bravo u'av done it. With these steps you would be able to totally uninstall software program form window.


Do remember to leave your comments below.

You can also share us with your friends on facebook, tweeter, google plus e.t.c


#END#

Saturday, July 27, 2013

HOW TO CONFIGURE ALL PC BROWSERS

So many people have um been asking s0 many questi0ns 0n hw t0 c0nfigure their PC for free browsing .


Now ama break it int0 smaller molecules.

Just s0 you can pick every single piece and make some sense from it.

lets start wit internet xploral

When ever an ip and a port is given to you and you are somewhat dazed on how to insert these ip and ports to work for you , you can tune to wapbeast for guidelines.


HOW TO C0NFIGURE INTERNET EXPL0RAL


1. 0pen the internet expl0ral through the ic0n 0n your system deskt0p


2. when it 0pens click 0n

t00ls =>internet=>0pti0n


3. Now click 0n c0nnecti0n =>settingz=>

after that a new p¤ge would p0p up.


4. Tick the use of pr0xy server


than enter the ip and p0rt given t0 you


5.

save and exit

Get the lastest version here
Internet explorer


HOW TO C0NFIGURE YOUR M0ZILLA


1. 0pen your m0zilla you can use the ic0n 0n ur system deskt0p

.

2. Click 0n

t00lz=>0pti0nz=>netwrk=>settings


3. u wuld b pr0vided with three 0pti0ns t0 ch00se fr0m


ch00se the last 0ne . that is the

"manual c0nfigurati0n"

n0w insert all the detailz given t0 You.


Your iP and port


save and exit
Get the lastest version here
Fire fox

H0W T0 C0NFIGURE G00GLE CHR0ME F0R BR0WSING


1. 0pen the g00gle chr0me, you can use the ic0n 0n your sytem deskt0p.


2. t00lz=>0pti0n=>

then a tab with many 0ption will p0p 0ut

.

3. click"under the h00d"scr0ll down t0

netwrk=>click 0n the change pr0xy settings

4).Under the c0nnecti0n tab =>click lan settings and select use pr0xy server.


5. Then enter the"pr0xy"iP and p0rt given t0 you save and exit

Get the lastest version here
Google chrome


HOW T0 C0NFIGURE YOUR OPERA-MINI BR0WSER F0R PC


.

New versi0n opera


1. 0pen your opera , click 0n the menu 0n the page

menu=>settingz=>preference


old versi0n opera

click 0n t00lz=>preference


2. you will see a p0p up will c0me 0ut click 0n advance


3. l0cate and click 0n netwrk=>pr0xyserver


4. now tick what has been given t0 you.


If you are filling http, you tick the b0x f0r http befor filling


.

5. insert your ip and the p0rt given t0 you save and exit
Download the lastest Version here =>Opera mini

#END#

 
Design by koozee Contact08136470405